0%

权限控制

原则 RBAC

v1.0 基础角色权限

  1. 用户
  2. 角色
  3. 权限(菜单)

  • 菜单和权限合并使用:菜单有菜单链接、权限有权限码(相同含义);权限包含页面、按钮级别
  • 角色需要关联菜单权限
  • 用户需要关联角色

扩展问题 ?
  1. 方法(操作、数据)权限如何处理?
  2. 多租户权限如何处理?
  3. 组织结构(多级)权限如何处理?
  4. 审核功能如何处理?
  5. 微服务中认证中心的权限信息如何传递到个微服务?

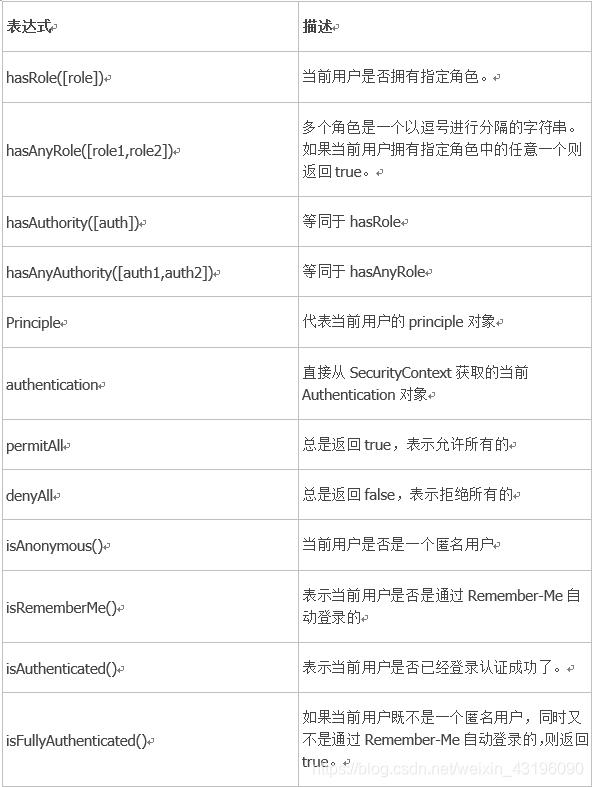
v1.1 方法权限处理 -> 针对 Spring Security 框架

通过配置拦截器(url 地址)

1
2
3
4
5
6
7
8
protected void configure(HttpSecurity http) throws Exception {
http.authorizeRequests()
.antMatchers("/admin/**").hasRole("admin")
.antMatchers("/user/**").hasAnyRole("admin", "user")
.anyRequest().authenticated()
.and()
...
}

通过过滤器

  1. @PreFilter
  2. @PostFilter

通过注解

  1. JSR-250
  • @RolesAllowed 表示访问对应方法时所应该具有的角色示例

    可以省略前缀 ROLE_,实际的权限可能是 ROLE_ADMIN
  • @PermitAll 表示允许所有的角色进行访问,也就是说不进行权限控制
  • @DenyAll 是和 PermitAll 相反的,表示无论什么角色都不能访问
  1. Spring Security
  • @PreAuthorize:方法执行前进行权限检查
  • @PostAuthorize:方法执行后进行权限检查

    通过 Spring EL 表达式
    方法内容
  • @Secured:类似于 @PreAuthorize

参考

Spring Security 中的四种权限控制方式

v1.2 多租户权限处理

microservices-platform 处理方案

  1. 本项目因为主要设计面向的是中台架构,所以用户数据是共享的并不会隔离,以实现多应用共享同一用户
  2. 菜单、角色管理和 token 管理这 3 个功能(能看到所有租户的数据),由管理员统一为各个租户维护数据,其他租户不需要看到这 3 个菜单

davinci 处理方案

  1. 组织

参考

码农家园

v1.3 组织机构(多级)权限处理

  1. 权限多级(前端):
  • 默认展示树结构,且要求全部数据展示
  • 角色关联权限
  • 选中后全部关联,并传到后台
  • 后台只根据前端选中的数据进行存储判断
  1. 角色多级(树结构-系统操作):
  • 角色进行层级运帷,与权限结构相似
  • 组织机构和角色进行关联树结构 -> 实现组织机构的权限处理

v1.4 审核功能权限处理

Spring Security 请求流程

token 过期请求流程

  1. EnableConfigurationProperties 开启 security
  2. ResourceServerSecurityConfigurer 资源安全服务配置
  3. OAuth2AuthenticationManager oauthAuthenticationManager = new OAuth2AuthenticationManager(); 鉴权认证
  4. OAuth2Authentication auth = tokenServices.loadAuthentication(token); token 认证
  5. DefaultTokenServices.loadAuthentication(String accessTokenValue) throws AuthenticationException, InvalidTokenException 获取认证信息
  6. OAuth2AccessToken accessToken = tokenStore.readAccessToken(accessTokenValue); 读取认证信息
  7. CustomRedisTokenStore.readAccessToken(String tokenValue)
1
2
3
4
5
6
7
8
9
10
11
public OAuth2AccessToken readAccessToken(String tokenValue) {
byte[] key = serializeKey(ACCESS + tokenValue);
byte[] bytes;
RedisConnection conn = getConnection();
try {
bytes = conn.get(key);
} finally {
conn.close();
}
return deserializeAccessToken(bytes);
}
  1. OAuth2AuthenticationProcessingFilter.doFilter(ServletRequest req, ServletResponse res, FilterChain chain) throws IOException, ServletException filter 过滤

token 正常请求流程

  1. ResourceServerConfiguration.setAuthenticate(ExpressionUrlAuthorizationConfigurer.AuthorizedUrl authorizedUrl)
  2. permissionService.hasPermission(request, authentication)
  3. DefaultPermissionServiceImpl.hasPermission(Authentication authentication, String requestMethod, String requestURI)
  4. TokenEndpoint.postAccessToken /oauth/token

环境配置

Jenkins 环境搭建

注意点

  1. github 代码下载、更新慢、失败
    只使用git@github.com的 ssl 进行下载,不使用 http

  2. docker 默认使用 root 用户登录
    docker exec -it --user root jenkins /bin/bash

  3. maven 打包默认命令
    mvn -U clean package -Dmaven.test.skip=true

  4. Jenkins 修改密码
    find / -name config.xml
    删除配置文件内容

    vi /root/.jenkins/config.xml

    1
    2
    3
    4
    5
    6
    7
    8
    9
    <useSecurity>true</useSecurity>
    <authorizationStrategy class="hudson.security.FullControlOnceLoggedInAuthorizationStrategy">
    <denyAnonymousReadAccess>true</denyAnonymousReadAccess>
    </authorizationStrategy>
    <securityRealm class="hudson.security.HudsonPrivateSecurityRealm">
    <disableSignup>true</disableSignup>
    <enableCaptcha>false</enableCaptcha>
    </securityRealm>

    重启 jenkins

    1
    2
    3
    4
    5
    6
    7
    8
    9
    10
    11
    12
    13
    14

    进入首页-》系统管理-》全局安全配置

    把“启用安全”勾上和把Jenkins专有用户数据库勾上、允许用户注册勾上-》保存

    在系统管理-管理用户中修改admin用户密码

    还原config.xml

    重启jenkins

    用admin用户名和修改后密码登录
    [参考](https://blog.csdn.net/jlminghui/article/details/54952148)

  5. 生成 ssh 免密登录
    终端输入:cd ~/ .ssh
    终端输入:sudo ssh-keygen -t rsa -C “fmzh@sina.cn
    修改 pem 文件权限:chmod 600 key.pem
    链接:ssh -i key.pem root@IP
    复制到服务器上:ssh-copy-id -i ~/.ssh/id_rsa.pub root@remote-host
    ssh 免密登录
    关闭 ssh 密码登录

    1
    2
    3
    4
    5
    6
    7
    vi /etc/ssh/sshd_config
    PasswordAuthentication no
    service sshd restart

    ssh-keygen -b 4096 -t RSA -C "sicher@xm.com"
    systemctl restart sshd
    cat id_rsa.pub > authorized_keys

    mac 中使用 openssl 生成 rsa 密钥
    普通用户 ssh 文件登录

  6. jenkins 中配置 maven 路径没有权限
    chown -R jenkins:jenkins /root

  7. git 切换分支
    git branch -a
    git checkout -b origin/dev/spring-1/wii-dev

  8. linux 软连接
    ln -s /root/node-v12.21/bin/node /usr/local/binnode
    npm config set registry https://registry.npm.taobao.org
    npm -v
    node -v

  9. git 大小写敏感
    git config –get core.ignorecase
    git config core.ignorecase false
    清缓存
    npm cache clean - f

  10. ssh 通过名称访问
    参考内容

可以创建~/.ssh/config 文件并为每台服务器指定登录信息和验证方法,如下所示:

1
2
3
4
5
6
7
8
9
10
11
12
13
14
15

$ vim ~/.ssh/config

Host www
HostName www.ttlsa.com
Port 22
User root
IdentityFile ~/.ssh/id_rsa.pub
IdentitiesOnly yes

Host bbs
HostName 115.28.45.104
User anotheruser
PubkeyAuthentication no

然后直接指定别名进行登录
$ ssh www

选项注释:
HostName 指定登录的主机名或 IP 地址
Port 指定登录的端口号
User 登录用户名
IdentityFile 登录的公钥文件
IdentitiesOnly 只接受 SSH key 登录
PubkeyAuthentication

  1. 不同网段的互通访问
    静态路由
    route -p add 192.168.19.0 mask 255.255.255.0 192.168.0.148

  2. git 由 https 修改为通过git@github.com:app 进行下载
    ./git/config 文件中配置的
    https://github.com/xx
    修改为
    git@github.com:xx

  3. maven 中 package 不生成版本号,设置方法

1
2
3
4
5
<build>
<!-- 产生的构件的文件名,默认值是${artifactId}-${version} -->
<finalName>${project.artifactId}</finalName>
</build>

  1. git 查看忽略规则
    git check-ignore -v 被忽略的文件或文件夹

  2. git 查看子模块

1
2
3
4
5
6
7
8
9
10
11
git submodule

git submodule update

git rm --cached assets

test

fmzhf dsfsdf

sdfsaaffffmzh
centos 相关命令

文件树结构-tree

1
2
3
4
5
6
7
8
9
10
11
12
13
14
15
16
17
18
19
20
[root@cdh01 nti-bigdata-bg]# tree
.
├── clearExecutor.sh
├── clearSync.sh
├── executor.logging
├── nti-executor-1.0.0-SNAPSHOT.jar
├── nti-sync-1.0.0-SNAPSHOT.jar
├── startExecutor.sh
├── startSync.sh
├── sync.logging
└── temp
└── executor
├── json
├── jsonjobTmp-014d7df5bf5545afa928244e38d8313e.conf
├── jsonjobTmp-222afd6dc0d74229bd8af3a60fd52484.conf
├── jsonjobTmp-6e60e7db32be4261a1f359f3e7743cb0.conf
├── jsonjobTmp-870e9469b87642848178ca3b57618b3a.conf
└── jsonjobTmp-884bc4f8a4e3411699d2dc320037adce.conf

3 directories, 115 files

查看磁盘占用空间

1
2
3
4
5
6
7
8
9
10
11
[fmzh@localhost ~]$ df -h
文件系统 容量 已用 可用 已用% 挂载点
devtmpfs 2.9G 0 2.9G 0% /dev
tmpfs 2.9G 0 2.9G 0% /dev/shm
tmpfs 2.9G 8.8M 2.9G 1% /run
tmpfs 2.9G 0 2.9G 0% /sys/fs/cgroup
/dev/mapper/centos-root 150G 64G 87G 43% /
/dev/mapper/centos-home 46G 43G 2.7G 95% /home
/dev/sda1 1014M 192M 823M 19% /boot
tmpfs 581M 0 581M 0% /run/user/1000
tmpfs 581M 0 581M 0% /run/user/0

查看文件夹占用空间

1
2
3
4
5
6
7
8
9
10
11
12
13
14
15
16
17
18
19
20
21
22
23
24
[root@cdh01 nti-bigdata-bg]# du -h --max-depth=2 /data
229G /data/opt/java
60M /data/opt/www
13M /data/opt/nti-bigdata-ft
11M /data/opt/nti-datacollection-ft
14M /data/opt/nti-iot-ft
242G /data/opt
1.6G /data/applogs/xxl-job
1.6G /data/applogs
1.5M /data/fmzh/hadoop-common-2.2.0-bin
72K /data/fmzh/static_dir
1.8M /data/fmzh/static_dir_tmp
345M /data/fmzh/docker
247M /data/fmzh/dataplatform_v0.0.1
12G /data/fmzh/nti-dataplatform-bg
196M /data/fmzh/logs
153M /data/fmzh/davinci
172K /data/fmzh/redis
15G /data/fmzh/nti-bigdata-bg
0 /data/fmzh/arthas-output
29G /data/fmzh
1.1G /data/source
0 /data/record
321G /data

查找

1
2
3
4
5
6
7
8
9
10
11
12
13
14
15
16
17
18
19
20
21
22
23
24
25
26
27
28
29
30
31
32
33
34
35
36
37
38
39
40
41
42
43
44
45
46
47
48
49
50
51
52
53
54
55
56
# 查找文件名
find 搜索目录 -name 目标名字
find / -name file名
/代表是全盘搜索,也可以指定目录搜索

find 搜索文件的命令格式:
find [搜索范围] [匹配条件]
选项:
-name 根据名字查找
-size 根据文件大小查找, +,-:大于设置的大小,直接写大小是等于
-user 查找用户名的所有者的所有文件
-group 根据所属组查找相关文件
-type 根据文件类型查找(f文件,d目录,l软链接文件)
-inum 根据i节点查找
-amin 访问时间access
-cmin 文件属性change
-mmin 文件内容modify


# 查找文件内容------注意和find的放置位置差别
grep aaa *.log


# 删除文件 ---文件名存在空格;时间比较
tmp=`ls /root/sign/tmp/ | tr " " "?"`

for i in $tmp
do
if [ $i ];then
f=${i//'?'/' '}
a=`stat -c %Y /root/sign/tmp/"$f"`
b=`date +%s`
if [ $[ $b - $a ] -gt 500 ];then
echo "delete file:$f"
rm -rf /root/sign/tmp/"$f"
fi
fi
done

# 删除文件 --- 查找test文件或者目录,并删除
find / -name test | xargs rm -rf

# 可以查找 /home下最近两天修改过的文件:
find /home -type f -mtime -2
# 如果要把这些文件也删掉,那么可以:
find /home -type f -mtime -2 -exec rm {} \;

-type f 查找文件
-type d 查找目录

-mtime -2 修改时间在2天内
-mtime +3 修改时间在3天前

-exec rm {} \; 将找到的文件 (假定找到文件的名字为 a.txt), 执行 rm a.txt 命令

# find有很多参数,有很强大的搜索功能,具体可以 man find 查看

参考

  1. for 有空格文件夹
  2. for 有空格文件夹

赋权-执行权限

1
2
3
4
5
首先了解用数字表示的属性的含义:0表示没有权限,1表示可执行权限,2表示可写权限,4表示可读权限,然后将其相加。所以数字属性的格式应为3个从0到7的八进制数,其顺序是(u)(g)(o)。

例如,如果想让某个文件的属主有“读/写”二种权限,需要把4(可读)+2(可写)=6(读/写)。

chmod 777 *.sh

赋权-将根目录赋权给其他用户

1
2
3
4
5
6
7
8
9
例1:把文件yusi123.com的所有者改为yusi。

$ chown yusi yusi123.com
例2:把目录/demo及其下的所有文件和子目录的属主改成yusi,属组改成users。

$ chown - R yusi.users /demo
例如:chown qq /home/qq (把home目录下的qq目录的拥有者改为qq用户)

例如:chown -R qq /home/qq (把home目录下的qq目录下的所有子文件的拥有者改为qq用户)

shell中的单引号和双银号的区别

1
2
3
4
5
单引号:所见即所得,即输出时会将单引号内的所有内容都原样输出,或者描述为单引号里面看到的什么就输出什么,这成为强引用。

双引号:输出双引号的所有内容;如果内容中有命令(要反引)、变量、特殊转义,会先把变量、命令、转义字符解析出结果,然后在输出最终内容,这称为弱引。

反引号:一般用于命令,执行的时候命令会被执行,相当于$(),赋值和输出都要用反引号引起来。

oracle 导入 dmp 文件

文件上传服务器

1
2
3
4
5
6
7
8
9
10
11
12
13
14
文件上传
sftp root@10.1.20.252

复制文件
docker cp LMIS20210118.7z oracle12c:/home/oracle/LMIS20210118.7z

7z文件解压
ubuntu:
apt-get install p7zip-full
7z x filename.7z

centos:
yum install p7zip -y
7za x file.7z

imp 导入

1
2
3
4
5
6
7
8
9
10
11
12
13
14
15
16
17
18
19
20
21
22
23
24
25
26
27
28
文件头几行内容
head -n 10 filename
tail -n 10 filename

docker exec -it oracle12c /bin/bash
sqlplus system/oracle@ORCL

create user rwms identified by rwms;
grant connect,resource,dba to rwms;

imp rwms/rwms@EE file=/home/oracle/xjrwms20210119.dmp ignore=y full=y

export TNS_ADMIN=/u01/app/oracle/product/12.2.0/EE/network/admin
EE =
(DESCRIPTION =
(ADDRESS_LIST =
(ADDRESS = (PROTOCOL = TCP)(HOST = 127.0.0.1 )(PORT = 1521))
)
(CONNECT_DATA =
(SID = EE)
// (SERVICE_NAME = EE) 修改为上面的内容
)
)

lsnrctl status
重启监听服务
lsnrctl stop
lsnrctl start

impdp 导入

1
2
3
4
5
create user ntixjyc identified by ntixjyc;
grant connect,resource,dba to ntixjyc;

mv /home/oracle/filename.dmp /u01/app/oracle/admin/orcl/dpdump/
impdp ntixjyc/ntixjyc@ORCL dumpfile=NTIXJYC20210118.DMP

问题

  • IMP-00038: Could not convert to environment character set’s handle
    使用 impdp 进行导入

  • ORA-12547: TNS:lost contact+oracle 开启监听失败

    1
    2
    3
    4
    5
    6
    7
    8
    9
    10
    sqlplus / as sysdba
    show parameter service_names
    show parameter local_l

    alter system set local_listener=local_l;

    alter system register;

    ```[相关参考资料1](https://blog.csdn.net/gua___gua/article/details/50983145)[相关参考资料2](https://logic.edchen.org/how-to-resolve-ora-12514-tns-listener-does-not-currently-know-of-service-requested-in-connect-descriptor/)_

  • ORA-12514: TNS:listener does not currently know of service requested in connect descriptor
    _在$ORACLE_HOME/network/admin/添加 tnsnames.ora 文件_

  • ORA-12505: TNS:listener does not currently know of SID given in connect
    sqlplus rwms/rwms@EE

docker 安装 yapi(1.9.2)

安装前提

  • node 12.18.2(14 会报异常)
  • mongo

docker 安装 mongo

1
2
3
4
5
6
7
8
docker pull mongo

docker run -itd --name mongo -p 27017:27017 mongo --auth

docker exec -it mongo mongo admin

db.createUser({ user:'admin',pwd:'fmzh1988',roles:[ { role:'userAdminAnyDatabase', db: 'admin'},"readWriteAnyDatabase"]});
db.auth('admin', 'fmzh1988')

node 高低版本切换

liunx 下 node 降级
linux 安装 nvm

1
2
3
4
5
6
7
8
9
10
11
12
13
14
15
16
17
18
19
20
21
22
23
24
25
26
curl -o- https://raw.githubusercontent.com/creationix/nvm/v0.31.1/install.sh | bash
or
wget -qO- https://raw.githubusercontent.com/creationix/nvm/v0.31.1/install.sh | bash

source ~/.bashrc

nvm install v12.18.2 # 下载node https://nodejs.org/download/release/v12.18.2/
nvm alias default 12.18.2 #将 12.18.2版本设为默认版本

NVM 的基本使用
查看本地所有可以用的 Node.js 版本:

$ nvm list
查看服务器端可用的 Node.js 版本:

$ nvm ls-remote
推荐使用 8.* LTS 版本 (长久维护版本) ,使用以下命令安装:

$ nvm install 8.11.2
设置默认版本:

$ nvm use 8.11.2
$ nvm alias default 8.11.2
检查 Node.js 的版本:

$ node -v

yapi 安装

1
2
3
4
5
6
7
8
9
10
11
12
13
14
npm install -g yapi-cli --registry https://registry.npm.taobao.org
yapi server

在localhost:9090中打开进行配置数据库信息
公司名:foxhello
数据库:admin
用户名:admin
密码:fm**1**8
邮箱:fm****@sina.***

进入服务器my-yapi目录中
node vendors/server/app.js

进入localhost:3000中打开页面,通过邮箱和日志中提示的密码登录

yapi 官网

docker 安装 oracle12c

基本操作

  1. docker pull absolutapps/oracle-12c-ee
    查看 docker 日志:docker logs oracle_12c
    _复制文件:docker cp xjrwms20210119.dmp oracle_12c:/root/data/xjrwms20210119.dmp_
  2. 用户名密码:system/oracle@orcl 1521
  3. 基本命令
1
2
3
4
5
6
7
8
9
10
11
12
13
14
15
16
17
18
sqlplus /nolog

conn /as sysdba
select * from v$session;

--创建命名空间
create tablespace test_tablespace datafile '/DATA1/oradata/db/test1.dbf' size 1024M;
--创建用户
create user testuser identified by password123 default tablespace test_tablespace;

create user test identified by test;
grant connect,resource,dba to test;

imp test/test@orcl file=/root/data/xjrwms20210119.dmp ignore=y full=y

dba_tablespaces
dba_data_files

问题

  1. ORA-12547: TNS:lost contact
    原因权限不够
    确认$ORACLE_HOME/bin/oracle 文件权限是否有问题
1
2
3
4
5
6
7
8
9
10
最初的权限
[root@dbserver /]# ll $ORACLE_HOME/bin/oracle
-rwxr-x--x. 1 oracle dba 407988851 Aug 1 12:50 /usr/oracle/product/bin/oracle

修改后正确的权限
[root@dbserver /]# chmod 6751 $ORACLE_HOME/bin/oracle
[root@dbserver /]# ll $ORACLE_HOME/bin/oracle
-rwsr-s--x. 1 oracle dba 407988851 Aug 1 12:50 /usr/oracle/product/bin/oracle

lsnrctl start

2、IMP-00002: failed to open xjrws20210119.dmp for read
命令后添加 full=y

imp user/pwd@tns file=d:/****.dmp full=y

参考资料

docker 安装 oracle 12c
oracle 查看表空间及大小
ORA-12547: TNS:lost contact+oracle 开启监听失败