0%

注意点

  1. spring-mvc 引入 jackson-dataformat-xml 依赖后接口返回 xml
1
2
3
4
<dependency>
<groupId>com.fasterxml.jackson.dataformat</groupId>
<artifactId>jackson-dataformat-xml</artifactId>
</dependency>

webservice

cxf 实现 webservice

问题

  1. 如何提供服务、客户端如何调用?
    见参考资料

  2. wsdl 怎么看?

  3. postman 怎么调用?

1
2
3
4
5
6
7
8
9
10
11
12
13
14
15
16
http://localhost:8023/api/services/ws/fmzh?wsdl
方法:post
header:Content-Type=text/xml
参数:body - raw - xml
<soap:Envelope xmlns:soap="http://schemas.xmlsoap.org/soap/envelope/" xmlns:pm="http://server.webservice.iot.dataplatform.nti56.com">
  <soap:Body>
    <pm:fmzhMethod2>
<arg0 test="123">
<id>fmzh</id>
<eleClassA>fmzhName</eleClassA>
<birthday>2021-01-28T09:19:28.810+08:00</birthday>
<remark>你好</remark>
</arg0>
    </pm:fmzhMethod2>
  </soap:Body>
</soap:Envelope>
  1. 入参出参如何设置对象类型?
    定义 dto 对象即可
  2. xml 复杂标签如何设置
1
2
3
4
5
6
7
8
9
10
11
12
13
14
15
16
17
18
19
20
21
package com.nti56.dataplatform.iot.webservice.dto;

import lombok.Getter;
import lombok.Setter;

import javax.xml.bind.annotation.*;
import java.util.Date;

@Getter
@Setter
@XmlRootElement(name = "fields")
@XmlAccessorType(XmlAccessType.FIELD)
public class Request {
private String id;
@XmlElement(name="eleClassA")
private String name;
@XmlAttribute(name = "test")
private Integer age;
private Date birthday;
private String remark;
}

示例代码

springboot.example.apiversion

参考资料

基础入门
使用 postman 测试 webservice 接口 1
使用 postman 测试 webservice 接口 2


Ineffective mark-compacts near heap limit Allocation failed - JavaScript heap out of memory

export NODE_OPTIONS=–max_old_space_size=4096

stackoverflow

git error: RPC failed; result=35, HTTP code = 0 fatal: The remote end hung up unexpectedly

git config –global http.postBuffer 20M

文件比对

codemirror && diff-match-patch

官网示例
demo
diff-match-patch issue

vue 整合

1
2
3
4
5
6
7
8
9
10
11
12
13
14
15
16
17
18
19
20
21
22
23
24
25
26
27
28
29
30
31
32
33
34
35
36
37
38
39
40
41
42
43
44
45
46
47
npm install codemirror
npm install diff-match-patch

<template>
<div id="view"></div>
</template>
<script>
import CodeMirror from 'codemirror'
import 'codemirror/lib/codemirror.css'
import 'codemirror/addon/merge/merge.js'
import 'codemirror/addon/merge/merge.css'
import DiffMatchPatch from 'diff-match-patch'
window.diff_match_patch = DiffMatchPatch
window.DIFF_DELETE = -1
window.DIFF_INSERT = 1
window.DIFF_EQUAL = 0
export default {
name: 'Diff',
mounted () {
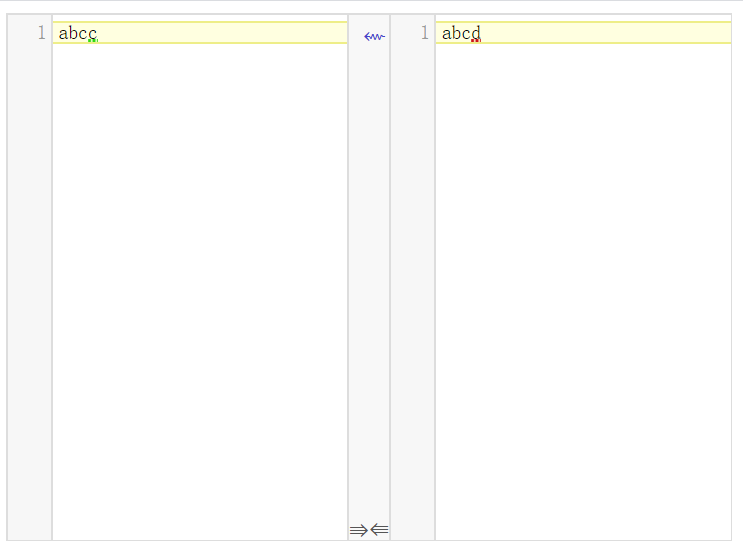
let value = 'abcc'
let orig2 = 'abcd'
this.initUI(value, orig2)
},
methods: {
initUI (value, orig2) {
if (value == null) {
return
}
let target = document.getElementById('view')
target.innerHTML = ''
CodeMirror.MergeView(target, {
value: value, // 上次内容
origLeft: null,
orig: orig2, // 本次内容
lineNumbers: true, // 显示行号
mode: 'text/html',
highlightDifferences: true,
connect: 'align',
revertButtons: true, // 是否显示还原按钮
readOnly: true// 只读 不可修改
})
}
}
}
</script>
<style scoped>
</style>
  • 效果

大数据

hive 基本命令如下:

1
2
3
4
5
6
7
8
9
10
#进入hive人机交互界面
hive

#操作类mysql
show databases;
show tables;
show partitions sync_job_log;

#添加分区
alter table sync_job_log add partition(dt=20210111);

hdfs 基本命令如下:

1
2
3
4
5
#切换hdfs用户
su hdfs

#查询创建目录
hdfs dfs -ls /user/hive/warehouse/nti_dev_proj.db

cdh6.2.0 操作步骤:

1
2
3
4
5
6
http://10.1.20.246:7180/cmf/home
admin 123456

选择hdfs
选择Web UI -> apache3
选择Utilities -> Browse the file system

源码学习 (分析方法:5w2h)

  • what 数据同步工具
  • how 通过 python 执行,根据 json 配置信息,从源数据库同步到目的数据库
  • why 离线同步数据

问题

  1. 如何解析 json?
    使用 fastJson 解析 JSON.parse(json)生成 Object 对象(本质为 map 对象)
  2. 如何加载各个插件?
    使用 ClassLoader 加载 jar 包,通过配置文件 plugin.json 的 class 属性生成 Job 或者 Task 对象
  3. 具体配置是如何处理的?
    通过 Configuration 对象封装 json 转换的对象,通过 key 打平进行获取及存储, 见附录一

datax 相关命令

控制台测试命令

python D:/fmzh/datax/datax/datax/bin3.0/datax.py -p"-Dhadoop.home.dir=D:\thirdlib\hadoop-common-2.2.0-bin" jobTmp-d80defde826447bbb5f6d50e607633c2.conf > log.logging

附录

一 datax 中 json 扩展

1
2
3
4
5
6
7
8
9
10
11
12
13
14
15
16
17
18
19
20
21
22
23
24
25
26
27
28
29
30
31
32
33
34
35
36
37
38
39
40
41
42
43
44
45
46
47
48
49
50
51
52
53
54
55
56
57
58
59
60
61
62
63
64
65
66
67
68
69
70
71
72
73
74
75
76
77
78
79
80
81
82
83
84
85
86
87
88
89
90
91
92
93
94
95
96
97
98
99
100
101
102
103
/**
* 根据用户提供的json path,寻址具体的对象。
* <p/>
* <br>
* <p/>
* NOTE: 目前仅支持Map以及List下标寻址, 例如:
* <p/>
* <br />
* <p/>
* 对于如下JSON
* <p/>
* {"a": {"b": {"c": [0,1,2,3]}}}
* <p/>
* config.get("") 返回整个Map <br>
* config.get("a") 返回a下属整个Map <br>
* config.get("a.b.c") 返回c对应的数组List <br>
* config.get("a.b.c[0]") 返回数字0
*
* @return Java表示的JSON对象,如果path不存在或者对象不存在,均返回null。
*/
public Object get(final String path) {
this.checkPath(path);
try {
return this.findObject(path);
} catch (Exception e) {
return null;
}
}

private String split(final String path) {
return StringUtils.replace(path, "[", ".[");
}

private List<String> split2List(final String path) {
return Arrays.asList(StringUtils.split(split(path), "."));
}

private boolean isPathList(final String path) {
return path.contains("[") && path.contains("]");
}

private boolean isPathMap(final String path) {
return StringUtils.isNotBlank(path) && !isPathList(path);
}

private Object findObject(final String path) {
boolean isRootQuery = StringUtils.isBlank(path);
if (isRootQuery) {
return this.root;
}

Object target = this.root;

for (final String each : split2List(path)) {
if (isPathMap(each)) {
target = findObjectInMap(target, each);
continue;
} else {
target = findObjectInList(target, each);
continue;
}
}

return target;
}

@SuppressWarnings("unchecked")
private Object findObjectInMap(final Object target, final String index) {
boolean isMap = (target instanceof Map);
if (!isMap) {
throw new IllegalArgumentException(String.format(
"您提供的配置文件有误. 路径[%s]需要配置Json格式的Map对象,但该节点发现实际类型是[%s]. 请检查您的配置并作出修改.",
index, target.getClass().toString()));
}

Object result = ((Map<String, Object>) target).get(index);
if (null == result) {
throw new IllegalArgumentException(String.format(
"您提供的配置文件有误. 路径[%s]值为null,datax无法识别该配置. 请检查您的配置并作出修改.", index));
}

return result;
}

@SuppressWarnings({ "unchecked" })
private Object findObjectInList(final Object target, final String each) {
boolean isList = (target instanceof List);
if (!isList) {
throw new IllegalArgumentException(String.format(
"您提供的配置文件有误. 路径[%s]需要配置Json格式的Map对象,但该节点发现实际类型是[%s]. 请检查您的配置并作出修改.",
each, target.getClass().toString()));
}

String index = each.replace("[", "").replace("]", "");
if (!StringUtils.isNumeric(index)) {
throw new IllegalArgumentException(
String.format(
"系统编程错误,列表下标必须为数字类型,但该节点发现实际类型是[%s] ,该异常代表系统编程错误, 请联系DataX开发团队 !",
index));
}

return ((List<Object>) target).get(Integer.valueOf(index));
}

1、域名解析

实质:
将域名正向解析到可访问的 ip,或将 ip 反向解析回域名

2、实现方式

  • DNS 服务器
  • Nginx/hosts 文件

优略比较

DNS Nginx/hosts
共同点 1、配置域名,映射 ip
2、要求:连接的各服务器能ping通 (此内容也导致第3点)
3、不能内网穿透 (通过dns进行google外网访问行不通)
实现方法 1、服务端安装bind程序
2、客户端中dns配置服务端地址
1、安装nginx(客户端服务端皆可)
2、客户端hosts文件配置nginx服务器ip和域名映射关系
其他 需解决代理后不能访问其他网址问题:
解决方法:添加dns配置114.114.114.114
可以用其他功能:
1、静态资源映射
2、负载均衡
3、网关代理
4、。。。

3、游戏私服部署方案

要求

  • 将 0101.90yx.top 映射到 192.168.1.10 服务器上

3.1、内网部署

  1. 在 192.168.1.8 安装 dns 服务器
  2. 将 192.168.1.10 映射到 0101.90yx.top 域名上
  3. 将手机与服务器连接到相同网络
  4. 将手机网络的网关手动修改为:192.168.1.8、114.114.114.114
  5. 访问测试

3.2、外网部署

  1. 在外网服务器安装 bind 程序:120.79.79.145(阿里云服务器)
  2. 开放 120.79.79.145 的 53 端口
  3. 将 120.79.79.145 映射到 0101.90yx.top 域名上
  4. 安装 nginx 程序,添加网关,将 120.79.79.145 的请求转到二级域名 game.foxhello.cn
  5. 通过 frps 将内网地址 192.168.1.10 的服务挂到 game.foxhello.cn 上
  6. 将手机网络的网关手动修改为:120.79.79.145、114.114.114.114
  7. 访问测试